LPing & Compounding in Cosmos v1.0.0
You asked, ChainTools delivers. Here is our promised entry-level tutorial to get you started on Dexs (Decentralised Exchanges) within the Cosmos eco-system.

To get you started, we will cover Junoswap and Osmosis.zone, Sifchain.finance will come later in v1.0.1. These three are at the heart of Cosmos and we will cover some tips and tricks to use on each Dex to maximize the yield you can earn.
There are many strategies and multiple approaches one can employ in Defi according to one’s own risk profile. We are simply covering a few strategies in this tutorial and NONE OF WHAT WE COVER HERE SHOULD BE CONSIDERED AS FINANCIAL ADVICE, this content is for educational purposes only and we encourage you to research further on your own to fully understand all risks associated with using any defi product. Your registered financial advisor can guide you further. With that out the way, let’s get your big boy pants on and dive right in.
Setting up a Keplr wallet.
Keplr is the interchain wallet and what you will need to get started in the Cosmos ecosystem. It is also available as a mobile app version for both Android and IOS. For our purposes, we will cover PC/Mac use in this tutorial.
- You can download and install by clicking Keplr. First time users will be asked to “add to chrome” if you are using Brave it is the same process.

2. Create new wallet and WRITE DOWN YOUR SEED PHRASE & DO NOT SHOW IT TO ANYONE (Big boy pants, remember?). More in-depth instructions on this are found in other tutorials such as this one.
3. Now you have got Wallet set up its time to buy some $ATOM…
The Cosmos Hub is a blockchain at the heart of the Interchain — an extended network of blockchains that are designed to scale and interoperate with each other. $ATOM is the Cosmos Hub’s primary token and secures the Hub’s valuable interchain services. It is a staking
coin that is primarily used for governance and security. By staking ATOM with validators, users earn yield while securing the network. ATOM also acts as the key that unlocks access to the Interchain which we will explore further below.
Coingecko is great resource to check where any cryptocurrency is available. Click here to see where you can buy $ATOM.
Personally we use Crypto.com if you want to download and install you can use our referral link to get set up on the mobile app.
4. Once you have bought $ATOM at the exchange of your choice, we need to get it on chain by sending it to your Keplr Cosmos Address.
The address can be found here. Copy this address and paste it to wherever you are sending from, double checking you have the correct address and chain (Cosmos) selected.
Note: Remember to leave a little $ATOM for gas. We recommend leaving 0.05 $ATOM this should be enough to cover fees.
Release the beast — Osmosis.zone

One of the first Dexs built on Cosmos that is unique in that it is an AMM (Automatic Market Maker) protocol that offers assets from different chains in pairs. Most token pairs on Osmosis include either $OSMO, the Dex’s native token or $ATOM as the liquidity pairing, with some exceptions.
Visit Osmosis.zone and approve the chain configuration prompt when it shows. This enables your Keplr to interact with the Dex. Exactly like Uniswap with Metamask — only better, smoother, faster and cheaper.
- Once you have bought and deposited $ATOM to your Keplr you are ready to deposit $ATOM in to Osmosis using the technology called IBC. In short IBC is the module that enables value, messages and now smart-contracts to be sent between any Cosmos chain which has IBC enabled.
- Open Osmosis.zone and click ‘Assets’ in the menu on the left of the homepage. (This is where you will be able to Deposit or Withdraw any IBC assets.) Click deposit $ATOM and the Dex will automatically configure the chain. A pop up will appear displaying your available balance of $ATOM that was deposited in to your Keplr wallet. Now Deposit $ATOM remembering to leave a small amount for Gas in your Cosmos Address. Good? Right lets get to the fun stuff.

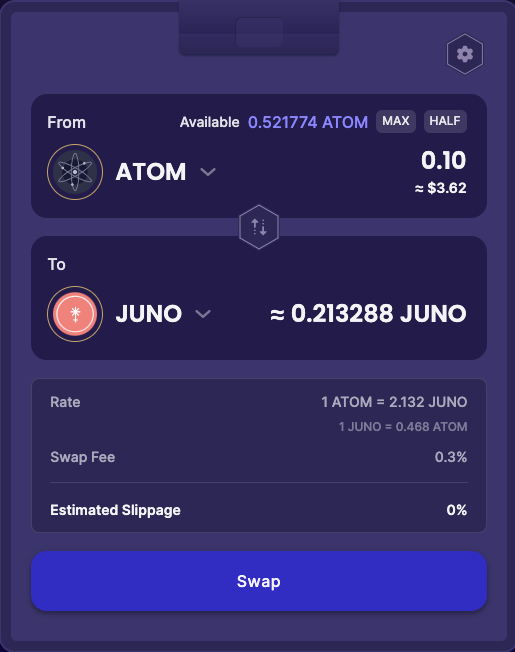
3. Trade ATOM for some JUNO. We will need some of that for the next chapter ;).
After you approve the tx you will notice that it uses $OSMO for gas fees. But at the time of writing gas fees cost 0 on Osmosis. This may change but worth noting.
Recap. So we have interacted with 2 separate chains so far. When you were depositing $ATOM in to Osmosis from Keplr it used $ATOM to pay for the gas. And now that $ATOM is in Osmosis chain it is now required for you to use $OSMO to pay for gas because you are on…. yes you guessed it. OSMOSIS-CHAIN.
IBC enables you to move Cosmos native assets in and out of different blockchains. This is the power of interoperability that makes the Interchain unique. Remember, whenever you use a different chain, irrespective of the coin you are using, be it Osmosis, Sifchain, Juno or any of the hundreds launching in the near future — You need the chain you are on’s native token to pay for gas.
4. Providing Liquidity (LPing) is great on Osmosis.zone. It’s simple, cheap and you can earn large rewards paid out in $OSMO, Osmosis Chain’s native asset. Rewards are earned by providing liquidity to POOLs. (Pairs of tokens)
@ConeyDaddy who we are a big fan of promotes Osmosis truly brilliantly Coney Video here is a simple and funny explanation of the Osmosis POOLs.
5. Add Liquidity by selecting what pool you want to enter. You are shown the % apr — which users receive each day (EPOCH) in the shape of $OSMO. Rewards are distributed daily at 17h00 UTC.
In this example we have entered the ATOM/OSMO pool with over 445m at the time of writing. This is quite large so as Coney quite rightly says. It can handle the biggest txs.


So you notice here that the pool ratio for ATOM/OSMO is 50/50. That simply means how much atom you intend to add needs to be matched by $OSMO. If you don’t want to top up with $OSMO, then not to worry, you can select ‘Single Asset LP’ which will automatically trade your assets into a 50/50 ratio. Neat.

6. Approve the tx and wait for it to be included on chain. Once its complete you will see in the pool page a balance showing under ‘My liquidity’ on the page of the pool you joined. Congratulations, you have now created a LP pair, but at this stage you are only earning the swap fees.
7. Let’s get you earning some more yield. You can now choose to ‘bond’ your LP tokens, which will lock them up for your chosen period of time, the longer the lockup, the higher the yield. Click on ‘Start Earning’ and make your selection.

NOTE: Be cautious when deciding how long you want to bond. Take note of this chart that is provided below.

You will now earn sweet $OSMO rewards every day. It will be dropped directly to your Osmosis balance which will show on Keplr and the Assets page within Osmosis.
Some tips on strategies and managing $OSMO rewards
- Our strategies vary depending on market conditions, but here are some ideas for you to consider and research further based on what we do:
- We use multiple wallets/accounts managing diff strategies at the same time. (You can manage multiple accounts within Keprl by clicking the icon on the top right and adding an account. You will have to go through the same steps as setting up your primary account and safely store a new seed phrase for every account you add).
- Our primary wallet is earmarked to LP and farm more $OSMO. We take half of the daily $OSMO rewards and add that to our existing pools, effectively compounding rewards daily. Albert Einstein famously stated “Compound interest is the 8th wonder of the world”. He is not wrong and Osmosis.Zone is a powerful tool proving just that.
- We transfer the remaining half of rewards to a separate holding wallet. If the market is doing well and prices are up, we sell to $UST on the TRADE page of Osmosis and park $UST in our HOLD wallet. This builds up a $UST reserve enabling us to ‘buy the dip’ when the market is fearful.
- We have another wallet set up specifically as a long term hold. You could earmark a wallet like this if you were saving a deposit for a house, for example. We use this LONG HOLD wallet’s assets to farm even more $OSMO. The UST/OSMO pool is quite attractive for this with a very high %Apr. Pairing into an LP with a stable coin reduces volatility by making the one side of the LP a stable value. Of course, these high Aprs are not without risk as an $OSMO price drop could cause some IL (impermanent loss) which would only drain your $UST and top up your OSMO ratio. More on IL here.
- If you are more risk averse and want to follow a similar strategy, you could consider the EEUR/UST pool. This is just pairing a Euro and Dollar stablecoin, minimising any risk of IL or market volatility. This strategy offers a lower APR and is also very low risk. (Around 16% at the time of writing for a 2 week bonding period, but what bank offers you this?)
- Our next long term strategy is Staking our rewards on chain, which helps to secure the network while earning us yield. We trade rewarded $OSMO for example to $JUNO which we withdraw from the Assets page and then Stake from within the Keplr wallet. When you select ‘Stake’ the Keplr App will automatically launch on the staking page from where you can manage your staking by delegating tokens to validators such as Highlander Nodes. See the last section of this tutorial for more notes about staking. Staking should without a doubt be your LONG TERM PLAY. Staked tokens are locked for up to 28 days (chain depending) and you should be prepared to stake even through a bear market. The value of your tokens may decrease but you will constantly be earning yield in return for securing the chain.
- Our other long term Strategy is topping up our BTC reserves with LP rewards. Personally, we will be looking into $NETA as our store of value soon. You can read more about $NETA here which will be launched on JUNO on 1 February 2022, we are very excited about this development within the Cosmos ecosystem.
Enter Junoswap.com

Juno network is a decentralised, public, permissionless, IBC enabled network for cross-chain smart contracts. Users can create and use cross-chain Apps and Junoswap is the first AMM built on Juno network | http://discord.gg/juno
Junoswap is to the Juno Network what Osmosis.zone is to the Osmosis Chain, except that it offers Cosmwasm smart contracts and is permissionless. This means anyone can launch a token on Junoswap and there are likely to be hundreds of pairings with $JUNO being the main Liquidity pairing for these tokens.
To use Junoswap
- Before we start Junoswapping, we need to get some $JUNO on chain first if you do not have any already. Open Osmosis.zone and trade to get a $JUNO balance on Osmosis, like we covered in the section above. Go to ‘Assets’ and withdraw the $JUNO to your Juno Wallet address using IBC. Connect to the Dex. Visit Junoswap.com and you will be asked to connect your Keplr wallet the first time you visit the site. By approving the connection the chain will be configured into your Keplr wallet enabling interaction.

2. Once your wallet is connected, you can navigate to the different pages on the Dex using the menu on the left side of the homepage.
We have named this wallet of ours ‘TUTORIAL’ and you can see your $JUNO wallet balance at the top of the menu.
In the image below, you can see the Menu options on the left side being: SWAP, TRANSFER & LIQUIDITY. Lets start with the SWAP page.

Swap
Swapping simple and slick on Junoswap. You can select a number of assets to swap, and when Juno grows with its native cw-20 assets this will drive more and more value in to the dex. More TVL locked, more Pools to choose and more competitive APRs. At the time of writing, directly after Junoswap’s launch, we already have a number of tokens available shown in the image below.

Transfer
Easily and quickly initiate payments across IBC. Here you can deposit any IBC asset from your keplr wallet straight in to Junoswap. This list will grow as more and more chains are enabled through the power of IBC. Make sure you take note of this and come back in 3 months to see how much Juno has grown.
Liquidity
Here is where you can begin to LP, like we did in the pools on Osmosis.zone. The difference here is that all pairs include Juno.
At the time of writing, Junoswap was so new that LPs are not incentivised yet, but governance proposals are live to address this. Despite this, total liquidity has grown exponentially since launch with many users eager to be ready when rewards are activated. Once incentives are enabled, APR will be displayed for each pool as a percentage.

Let’s dive in and provide some liquidity as an example, it is the same process as Osmosis.zone and you should find it fairly easy by now:
We’ll select the Juno/Atom pool. We will need to match whatever $JUNO we are pooling with the same amount of (monetary) value in the form of $ATOM to create a 50/50 pool ratio.

Once we’ve decided how much we are providing, confirm the tx with Keplr wallet and we will see our LP position and its current $ dollar value & the amount of each token in the LP pair.

Above is an example from LP we provided to JUNO/UST earlier…
Once liquidity incentives go live in February 2022, we shall update this article and share to the community.
Staking using Keplr Wallet.
Juno’s tokenomics make it extremely lucrative to stake directly on chain for at least the first few years of Juno network’s existence. (40% inflation of the genesis supply in the first year resulting in >100%APRs).
As of mid January 2022, Juno was integrated directly into the Keplr Wallet enabling staking from the wallet without the use of third party interfaces.

To Stake your Juno on Chain:
- Open the Keplr Wallet and select Juno Network.
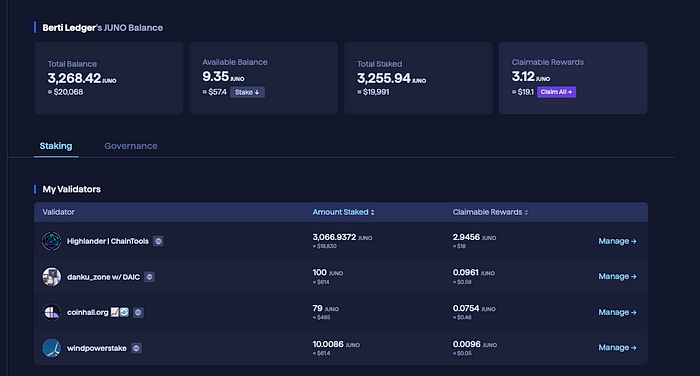
- Click the ‘Stake’ button, which will automatically open the Keplr App on the Staking page, where you will see a list of all the validators securing the chain. From here you can choose who to delegate your $Juno to. The rewards earned from all validators are the same. The commission column indicates what percentage of the rewards the validator will keep in exchange for their services provided.
A Note on choosing a validator
Don’t just select a validator at the top of the list, in the image below, we have specifically shown you some of the lower ranking validators on the network. We believe in decentralisation and that the voting power must not be concentrated amongst the top 10 validators only. Comparatively, Juno is about as decentralised as you would want a network to be, but for the long term security and growth of the chain we encourage delegations to lower ranking validators who contribute to the network. You do not need to delegate to Highlander Nodes, consider researching some of the validators we have highlighted in the image below, many of whom we have run testnets with. It is still important to get in touch with a validator and vet them as staking is not risk free.
3. In the image below you will see the option where you can now delegate your $JUNO to the validator you have selected. Always remember to leave some $JUNO for gas. We recommend to leave a balance of 0.1 $JUNO in your wallet at all times to cover the cost to stake, claim rewards and vote on governance proposals.

4. You are now earning $JUNO, congrats!. You will start to see rewards accrue under ‘Pending Reward’ immediately with each block. You can claim rewards whenever you want to and move them to Junoswap, Osmosis or compound them, which is a great strategy while rewards are high. Remember — STAKING $JUNO, LOCKS YOUR TOKENS FOR 28 DAYS. Should you unstake them, you will have to wait for a period of 28 days before you can move them. You will also not earn any rewards during that period, which is why we highlighted above that Staking is a long term strategy. Don’t forget what Albert Einstein said about compounding interest — with staking — you can claim and compound your rewards regularly.
Well done you have now completed the staking steps. :).
While we are on the Juno Staking Page — This is also the same page where you will be able to participate in on chain Governance. If you have staked tokens, you now have a right to be actively involved in governance decisions involving upgrades, community ideas and incentives. Active Governance proposals can be found in the circled area in the image below.

Thank you for taking the time to read through our notes. We hope you find these strategies useful as you further your research and start earning yield within the Cosmos Ecosystem.
if you want to stake Juno and need more notes than what we have laid out above, our updated Juno staking guide will be released shortly.
